Happy Plaid Birthday, With Googly Eyes On Top!

Hello Fellow Paper Crafters!

I know it’s been a while since I’ve shared some handmade cards with you – I’ve been awfully busy.  Case and point, I’m just getting around to playing with my May 2016 Simon Says Stamp Card Kit.  So yeah, if you are keeping track here, I am one card kit behind.  So… I unsubscribed for the time being with plans to order once a quarter.  As much as I love card crafting, life is just too hectic to use up all of my monthly goodies.  Plus, we are heading into summer and my garden is calling my name.  Any who, below is the May card kit.  I just loved this kit!  It was perfect for spring-time.

IMG_0846

So what project did I dream up with this card kit?  A friend (who is pretty much a brother to me) was celebrating their birthday at the beginning of June so I used this kit to create him a birthday card.  Of course I took some time for colour-therapy with these stamps.  Just. So. Freaking. Cute.

IMG_0864

Side note: I still have not tried stamps with coordinating die sets, but it looks and sounds so attractive!  I mean I don’t mind taking the time to cut my stamps out, I just think of how much time would be saved (and my poor hands with those crafting scissors – yikes).  Some stamps are just so intricate (i.e. the umbrella handle on the stamp above).  So the next stamp set I get, I promise, I’m going to break down and buy the die set as well. 🙂

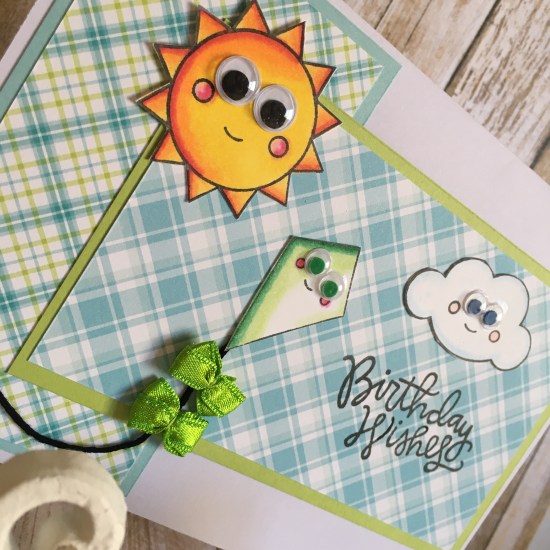
So birthday card!  Focus!  🙂  Below is what I came up with. Yup, I can’t even.  I added googly eyes (**smiles uncontrollably**), because well, googly eyes are never a bad idea.  See for yourself?  Cute right?

IMG_1031

For this birthday greeting card you will need:

  • Card stock (I used Lawn Fawn plain white for the card base, solid blue and green, and plaid patterned paper – all from the May SSSCK)
  • Paper trimmer
  • SSS Happy Days stamp set, ink, and stamp block
  • Colouring weapon of choice (I used brush markers)
  • Scissors
  • Glue
  • Googly eyes (aka “Jiggly Eyes”- I bought mine at my local Walmart)
  • Ribbon bows and string
  • Sequins

IMG_1022

Measure and cut out the solid and patterned paper of choice.  I just eye-balled my pieces and then used my paper trimmer to get them down to size.  Stamp, colour, and cut out your little darling stamps of choice.  I arranged all of my paper pieces before gluing them all down.  You can use my layout above as inspiration or play around with other stamps and combinations.  These sets are so versatile, there are so many possibilities!

Once you’ve organized your layout, trim some string and glue it to your kite stamp.  Glue all paper pieces down.  Stamp your chosen greeting (I found that it’s easiest to stamp this prior to adding your googly eyes – add these last).  Finally, add your ribbon bows to your kite string (I got these cute little bow stickers at my local dollar store – I use them lots in card crafting!), googly eyes and sequins (I added six in total to the right corners of the card).

IMG_1028

So cute right?  My friend that I gave this to is quite a fan of plaid, so the card stock that came in the SSS card kit was perfect!  I was so excited to share this one with you (ohmegosh googly eyes!!!!), I hope you enjoyed it!  Did you receive this card kit or stamp set?  Leave me some love in the comments so I can check out your card crafting adventures!

Warmth,

Kim

Advertisement

Handmade Cards & Photography

Hello Card Crafting Friends!

Today was a fun and relaxing day.  I took a much needed staycation day today.  I spent the morning at the spa, wandered around Michaels (yay!), and cooked a wonderful dinner for my husband and I (with fresh baked bread, or course).  So let’s go back to that magical word “Michaels”, one of my favourite places in the world.  It’s one of those stores you walk into to get one, and one item only, and then two hours pass and you leave with 294,349,304 other items.  The. Struggle. Is. Real.  Today’s retail therapy trip to Michaels was to pick up supplies for photographing my handmade greeting cards.

IMG_9536
I’ve been doing some research on taking photos of my newly minted cards.  I’ve been so inspired by some bloggers and instagrammers.  Not only are their handmade cards  wonderful, so are the photos they take of their work.  I got some great inspiration from Maria Russell’s blog.    I’ve found through my research that it’s quite easy to take
some great shots of your work and it doesn’t require a lot of expensive equipment.  For example, this Hubpage gives some great tips.

IMG_9522

Here’s my take on greeting card photography.

For this card making idea, you will need:

  • Studio Tri-fold with one of the folds removed (I got the one above at the Dollarstore)
  • Neutral coloured scrapbook paper or card stock
  • Photo frame/easel/plate holder of choice
  • Some natural light
  • A handmade greeting card
  • A camera (my weapon of choice is my iPhone 6)

I went with this cute little rustic looking plate holder that I scored on my Michaels run today.  I figured this would go great with my neutral backgrounds (the paper I also got at Michaels).

Set up your now two-fold on it’s side and line up and glue your chosen paper or cardstock to both sides.  Place your chosen card holder in it’s newly created scene and add your handmade card creation.  Now get ready to be part of the paparazzi!  I’ve found from my research and personal experience today that natural light is the best.  Flash doesn’t do your work justice, trust me.

IMG_9529

In a nutshell, here are some tips I’ve found that work well:

  • No expensive camera equipment is necessary – most of us have camera phones 😉
  • Use a neutral background
  • Pick a location with bright natural light (or head outside!)
  • Prop your card up (frame/easel/plate holder) to get a good angle of your photo

IMG_9532

So there you have it!  I hope you picked up some tips on taking photos of your newly created paper crafts.  Do you have any tips on photographing your handmade greeting cards?  Be sure to leave me a comment with your tried and tested tips.

Warmth,

Kim

P.s. If you are wondering about the card I featured here, it’s a birthday card I made for my husband.  It’s a Mama Elephant stamp that I morphed to resemble our bunny @banjothebunny.  I also used my Martha Stewart cupcake and balloon paper punches, and my Cuttlebug cupcake embossing folder.


Hello Cupcake Handmade Card!

Hey there card crafters!

I crafted this handmade birthday card quite a bit for loved ones in 2015.  It’s simple yet colourful.  You can check out the inspiration for this design here (thanks to the one and only Martha Stewart).  See below for more inspiration and a list of items I used to make this greeting card.

16501534870_c1beb44f24_o

For this cupcake greeting card you will need:

  • Cardstock for the card
  • Colourful (include some glitter please) cardstock pieces (this is a great way to use up smaller pieces of leftover cardstock)
  • 1.25 inch Cupcake punch
  • Teeny tiny heart punch
  • Glue (I love the Martha Stewart glue pen – it’s a Tiffany blue colour but dries clear!)
  • Happy birthday embossing folder (for the variation below)
  • Die cutting machine (for the variation below)

23451833976_608e12cff7_o

Now punch, arrange, and glue!

Untitled.png

Aren’t cupcakes the best?  Well aren’t handmade birthday cards the best?

Warmth,

Kim


Handmade Card Zero

Card zero?  No, not at all.  More like the start of something wonderful and the first of many.  This card came about because I just couldn’t justify spending an arm and a leg on another retail greeting card.  There are some cards that I purchased that were close to $15!!  So starting in January of 2015 I set out to make my own personal handmade cards to give to friends and my loved ones.  Since this very first card, I’ve never looked back (…at retail store bought cards).

22968969942_9ea39923f2_o

My 2015 journey was one of finding inspiration and ideas (hello Pinterest!).  I will be sharing a few of my favourite card creations throughout 2015 on this blog before moving onto my new stuff for 2016.

I hope to share with you my new and favourite tools and some card crafters that inspired me.  Overall, my intent is to inspire you!  Gifting something hand-made is the most amazing feeling in the world because it’s completely personal and it comes from the heart.

I hope that you will join me on my cardstock, glitter and glue journey of handmade cards.

Warmth,

Kim